Yup, I know peplums are everywhere, but I believe they are one of the best additions to a woman’s wardrobe arsenal, simply because peplums create the illusion of that sexy hourglass shape! Peplums add fullness to your hips and help to make your waist look smaller. According to all the fashion mags, they are best worn with straight-legged pants (trousers or leggings or jeans) or knee-length pencil skirts.
All over the web I’ve found some great peplum tops worn by some beautiful ladies who inspired all shades of green envy with how flawlessly stylish they looked in their peplum outfits:

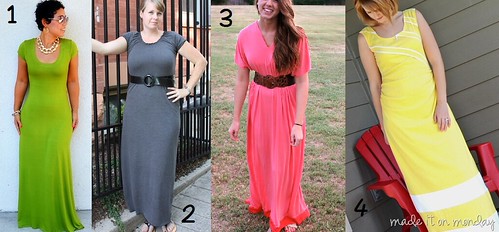
- BurdaStyle Peplum Top 08/2012 #113 made me fall in love with yellow AND to even like the high-low hem trend
- Adventures in Dressmaking – Springy Seersucker Peplum Tank sealed the deal on how cute yellow peplum tops are!
- Jorth – Vogue #8815 Peplum Top with its fantastic print and double-tiered peplum that didn’t even look little girlish
- Craft Habit – Peplum Top T-Shirt Upcycle was the first tee based peplum tutorial I ever saw and was really the initial idea that brought my attention to the DIY peplum top possibility
- So Zo, What Do You Know – Jersey Peplum Top used jersey fabric with three-quarter sleeves AND a slight high-low hem
- Love Maegen – Peplum T-Shirt DIY made the whole idea seem to freaking effortless! This lady is just rocking this white peplum tee !
With so much inspiration, of course, the peplum top made it on my birthday sewing wishlist! I mean, it just looks so elegant and classy.
So in an effort to not spend more money that I really can’t afford to spend on fabric right now, I tried the t-shirt to peplum top refashion for which the sew-inclined bloggers have several tutorials to help you. I bought this really nice purple baby tee when Mr. AD and I were cruising last year, which wasn’t the most flattering around the midsection but I still loved it. So when the peplum top want graduated into a need over the summer, I figured I would use this top as the base. I searched around my wardrobe for a XXL purple tee shirt and made the circle peplum part using the only shirt I could find that was as close to the same shade of purple as the baby tee.

It came out okay-ish. But I’m not really happy with the result. The two purples are not as complimentary as I was envisioning for one thing. Then with my short torso and overall stumpiness (is that a word?), I definitely needed to make the peplum part much longer to “elongate my torso” and especially as it really wasn’t covering the lower goodies as I would have liked without constant tugging. Lately, I’m also finding that the cap sleeves on the ladies fitted tees are starting to bother me because they seem so short and picky in photos, making your arms look even chunkier than they really are and they don’t help to flatter a larger bust at all. Not even wearing a belt was pleasing to my eye…
So yeah, this is now a home shirt. 😦 Oh and please forgive the shine showing through from my bra; it was a very poor choice to model in, but I needed pics.
For this particular sewing project, I also learnt the most important thing to note when making a standard circle bottoms from knit material. Since you have to cut the fabric on the bias to create the circle shape, you need to reduce your waist measurement about 2-4 inches depending on the stretch of the material you are using. If not, when you are sewing, you will find that your peplum waist will be bigger than the waist of your shirt or skirt at the point of join.
Abbey 3.0 Sewing Wishlist Status: Item 2 Epic Fail. I’m definitely going to have to do another peplum project. I will not let this one defeat me.